Hosting Multiple Full Stack Web Apps on a single VPS using Nginx and Docker
Friday, May 1, 2020 Posted in Systems-Administration-and-DevOpsTags : Docker Nginx Linux AWS Backend
Ever wonder how could you deploy your projects to make them publically accessible on the Internet? in this article, we are about to find out!
Many developers create projects related to their sub-field, either as passion projects or as a portfolio item to show off to prospective employers.
For web developers in particular, an important question arises about how to deploy these projects on the internet, since showing you have a set of working Web Apps is much better than just having your code on GitHub.
The most easiest way is to use a Platform-as-a-Service(PaaS) like Heroku, which allows you to host/deploy your web app without worrying about Systems Administration/DevOps related server configuration issues, you simply upload your code, and Heroku hosts a Container( called a Dyno ) that is publically accessible by a randomly generated/ named subdomain of Heroku for e.g your-project-name.herokuapp.com, aside from this ease of use, Heroku also is has a FREE plan that is the reason many developers use Heroku to host their projects.
I rejected this “solution” instead, I chose something different. I chose the impossible. I chose…
Well hosting my own Web App projects on my own Virtual Private Server(VPS).
This article details what all i had to do to get my setup to work
What will we be doing?
First we need a VPS, i am using AWS but you can use Azure,GCP or Digital Ocean, among many other providers.The VPS must have atleast 1GB RAM. These VPS cost $5 a month on average, and AWS,Azure,GCP have 12 month free trials, so you don’t need to spend money right away.
We also need a domain name, and make a sub domain which will point to your VPS, for e.g. demos.yourwebsite.com should point to your VPS’ IP Address like 192.168.2.1 for example.You can use the normal domain yourwebsite.com and www subdomain to host your portfolio website like me.
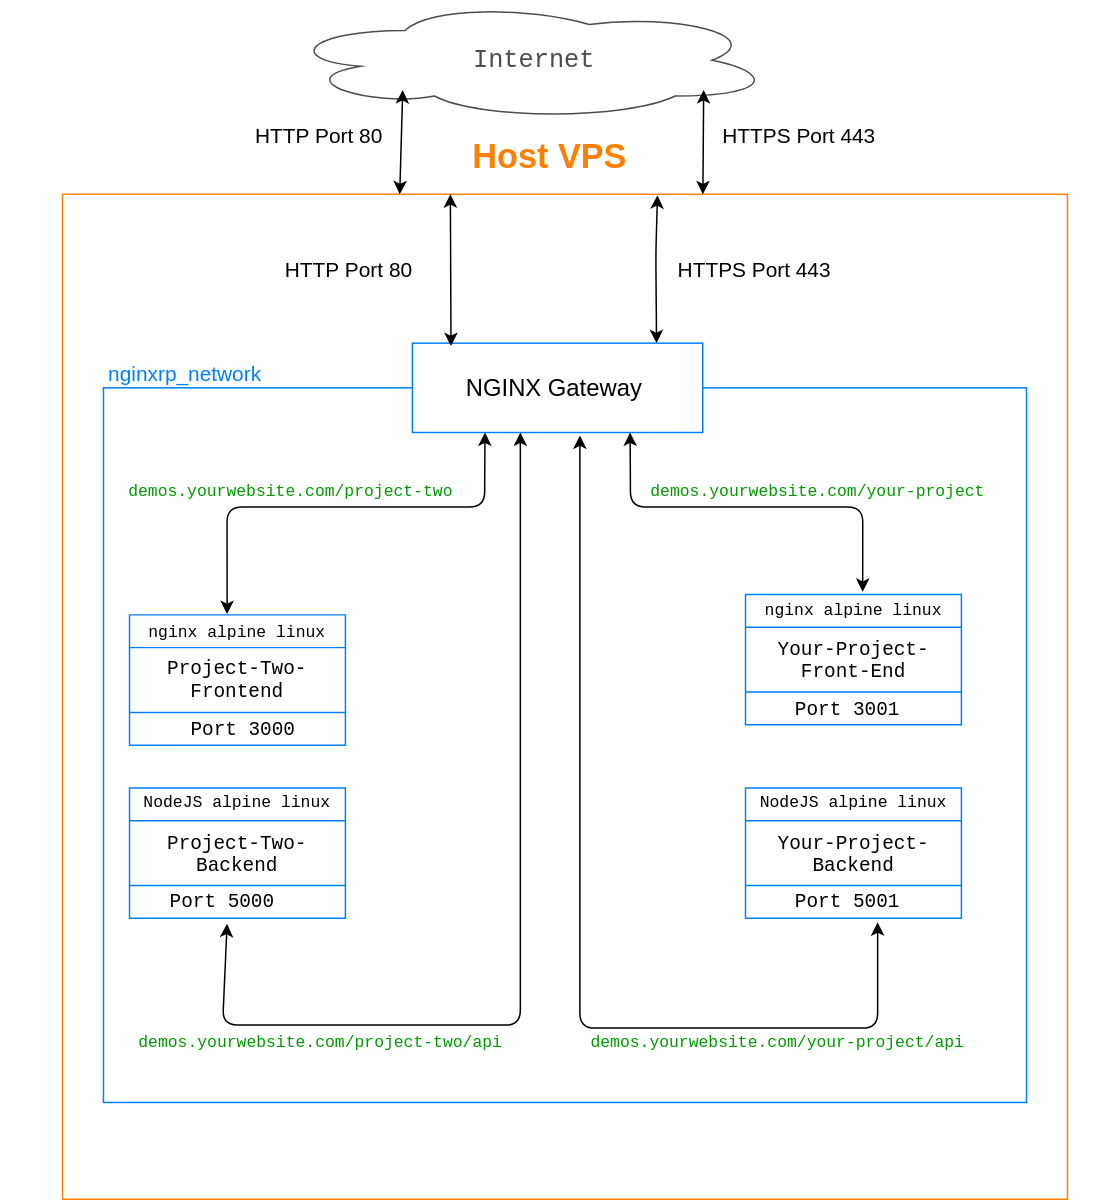
Our projects will be hosted out of subdirectories, i.e demos.yourwebsite.com/your-project, demos.yourwebsite.com/another-project etc, and we will only open the standard HTTP and HTTPS ports that are ports 80 and 443, the routing to each project will be handled using an NGINX reverse proxy, that will map each subdirectory in the incoming URL to the project servers specified in the nginx configuration file in /etc/nginx/conf.d/, of course, for this routing to work, your projects must have the Base URL set to demos.yourwebsite.com/your-project, for both front end and backend, however this is dependent on what language or framework you are using for your project, and will not be covered in this guide.
You can check out the below diagram to get a better idea. The blue lines and boxes signify docker containers and nginxrp_network is the docker network which all our containers are connected to
All your projects and the NGINX reverse proxy will be hosted in Docker containers, and you may be wondering..
Why are we using Docker?
For those who don’t know, Docker is a company that makes the “Docker Engine” software, that enables us to use Docker containers on our servers. A container is similar to a Virtual Machine instance, and provides similar features like sandboxing of applications, OS virtualization etc, however with one key difference, That the OS running inside a container is not fully “virtualized” as such, and still depends on the Linux Kernel of the host system, so in a nutshell, Containers provide most of the advantages of VMs without the overhead in resources, perfect for our use case.
You can build a docker container version of your project by configuring it so in a Dockerfile, by using a base image of an operating system like ubuntu, debian, centos etc.
< dockerfile example here >
These “base images” only contain the “user space” of the OS, since as mentioned before, the Kernel functions are provided by the host system.
I’d recommend we use Alpine Linux as the base image wherever possible, since it has the smallest “user space”, in both RAM and Storage use, which it accomplishes for e.g by using the lightweight musl instead of the standard and heavy glibc C library used in the standard distros.
Docker also provides virtualized networking features, which means we can put our containers on the same virtual network, while controlling access to which containers get access to the host, and hence the wider Internet.In our set-up, only the NGINX reverse proxy / gateway container will have access to the host system.
The NGINX Reverse-Proxy/Gateway Container
This is the Gateway from the wider Internet to all our other Web Apps deployed as containers on this server host, and as said before will take requests on Ports 80 and 443 and Proxy them to their respective projects by looking at the subdirectory portion of the incoming URL, then, the request will be passed on to the named( the name for a container is provided in the docker-compose.yml file and is visible to all containers on the network) container and port specific to that container.This functionality is handled by NGINX and configured in a file which we will call sites.conf located in the /etc/nginx/conf.d directory.
Docker compose is a utility that makes it easier to run docker containers, by letting you put all the configuration details in a YAML file, called docker-compose.yml that you would otherwise have to enter everytime manually on the terminal after the docker run command whenever you wanted to start your container.
Below is the docker-compose.yml file used to build our NGINX reverse proxy docker container.
version: '3'

services:
  nginx-rp-gateway:
    container_name: nginx-rp-gateway
    hostname: nginx-rp-gateway
    image: nginx:1.16.0
    ports:
      - 80:80
      - 443:443
    volumes:
      - ./conf/:/etc/nginx/conf.d/
      - ./html:/var/www/demos.shawndsilva.com/html
      - /etc/letsencrypt:/etc/letsencrypt
First we declare what version of docker-compose we are using with version: '3'
Then under services we describe what all services( i.e containers ) we want to run, and with what configuration options.
You can have many services in a docker-compose file.Using the container_name directive we hard-code the name nginx-rp-gateway to the container, instead of it getting a randomly generated name, with this name your container will be visible to all other containers which are on the same network.
The image directive describes which docker image in the docker hub that we want to pull(download) and use as a base for our container, in this case it is the official NGINX 1.16.0 image from the NGINX developers.
ports lets us set our ports, the number on the left of the colon is the port that is open to the host, i.e on the host you can communicate with the container by http://<CONTAINER IP>:80 while the number on the right of the colon is the port number that will be used by the containers on this network to communicate with each other, for example
from inside a container connected to the nginx-rp-gateway_default, the nginx-rp-gateway default container can be accessed by http://nginx-rp-gateway:80, we use nginx-rp-gateway here because that is what we named our container using container_name:.
The volumes: directive allows us to copy files from the host to the container, the directory to the left of the semicolon is the host, and the directory to the right is where we want to files from the host to be placed
We are first copying over our sites.conf config file to /etc/nginx/conf.d, this is the file that contains our reverse-proxy functionality that will direct requests to the relevant containers, next up is copying our lone index.html file which will be what the user sees when he visits demos.yoursite.com, but in this case simply has a redirect to my main website, altough you could spruce it up with whatever you wish.
Finally it copies over the entire /etc/letsencrypt directory to the nginx container version of /etc/letsencrypt, Let’s Encrypt is a free SSL Certificate provider, this command is optional if you don’t want or need SSL, so you can safely delete it if you want.
Now we will look in detail at the contents of the mysterious site.conf NGINX Configuration file
Configuring NGINX as a Reverse Proxy
First up we have the site.conf file, edited for brevity and clarity, this edited version in this blog post deals with only with the mern-sessions-auth-app which is it’s two servers, the front-end NGINX server containing the React front-end and the NodeJS server Backend.
upstream authserver {
        server auth-server:5000;
}

upstream sessions-auth-app {
        server client-prod:3000;
}

server {

        listen 80;
        listen [::]:80;
        listen 443 ssl;

        ssl_certificate /etc/letsencrypt/live/shawndsilva.com/fullchain.pem;
        ssl_certificate_key /etc/letsencrypt/live/shawndsilva.com/privkey.pem;

        include /etc/letsencrypt/options-ssl-nginx.conf;

        root /var/www/demos.shawndsilva.com/html;
        index index.html index.htm ;

        server_name  demos.shawndsilva.com;

        location / {
                try_files $uri $uri/ /index.html;
        }

        location /sessions-auth-app  {
                proxy_headers_hash_max_size 512;
                proxy_headers_hash_bucket_size 64;
                proxy_set_header Host $host;
                proxy_set_header X-Forwarded-Proto $scheme;
                proxy_set_header X-Real-IP $remote_addr;
                proxy_set_header X-Forwarded-For $proxy_add_x_forwarded_for;
                add_header Front-End-Https on;

                proxy_pass http://sessions-auth-app/;

               location /sessions-auth-app/api/ {
                         proxy_headers_hash_max_size 512;
                         proxy_headers_hash_bucket_size 64;
                         proxy_set_header Host $host;
                         proxy_set_header X-Forwarded-Proto $scheme;
                         proxy_set_header X-Real-IP $remote_addr;
                         proxy_set_header X-Forwarded-For $proxy_add_x_forwarded_for;

                        proxy_pass http://authserver;
                }

        }
}
We will go step-by-step explaining the configuration, NGINX configuration directives are in the form of blocks, that is some command followed by curly braces and some other commands in this “block” of curly braces.
upstream authserver {
        server auth-server:5000;
}

upstream sessions-auth-app {
        server client-prod:3000;
}
First off, here the upstream servers are being declared, for example in the upstream authserver block, the server auth-server:5000; is the docker container which contains our NodeJS backend, which was named auth-server in our docker-compose.yml file, with 5000 as it’s port.
In this site.conf file, we will reference auth-server:5000; by authserver, what we have named it in the upstream delcaration, NOT auth-server:5000;.In the same way, in this file sessions-auth-app will be used to refer to our front-end container called client-prod:3000;
We now move on to the server block, here are the first few lines that tell NGINX to listen on Port 80 for HTTP connections and on port 443 for SSL secured HTTPS connections.
server {

        listen 80;
        listen [::]:80;
        listen 443 ssl;
Next we have our Let’s Encrypt SSL Certificate, Public Key, and import NGINX specific config options from Let’s Encrypt.
        ssl_certificate /etc/letsencrypt/live/shawndsilva.com/fullchain.pem;
        ssl_certificate_key /etc/letsencrypt/live/shawndsilva.com/privkey.pem;

        include /etc/letsencrypt/options-ssl-nginx.conf;
Then we have the root directory of our HTML files being defined, which is /var/www/demos.shawndsilva.com/html but you can point it to any directory.
The server_name directive here is our domain name where we will be hosting our projects, you should put your own domain name here.
Lastly, the location / block tells NGINX what to do when a request is received at demos.shawndsilva.com/some/file.txt, it will try to match the “file” specified in the URI to the files in the root HTML directory and any subdirectories, if a request is received at root, i.e demos.shawndsilva.com with no other files or directories being requested as a part of the URI, it will return the index.html file.
        root /var/www/demos.shawndsilva.com/html;
        index index.html index.htm ;

        server_name  demos.shawndsilva.com;

        location / {
                try_files $uri $uri/ /index.html;
        }
Now to the meat and potatoes of this article, the Reverse Proxy, upon receiving a request at demos.shawndsilva.com/sessions-auth-app, NGINX Is directed to append certain HTTP headers relating to the Proxying, and then passes the request to the server http://sessions-auth-app/; mentioned by proxy_pass keyword , http://sessions-auth-app is the same one that was declared using the upstream keyword.
Within this location /sessions-auth-app block however, is another block called location /sessions-auth-app/api/.In my sessions-auth-app Web App, requests at /api are for the REST API NodeJS Backend, so any requests starting with /sessions-auth-app/api/ are passed over to the http://authserver, that is our container with the NodeJS Backend.
location /sessions-auth-app  {
                proxy_headers_hash_max_size 512;
                proxy_headers_hash_bucket_size 64;
                proxy_set_header Host $host;
                proxy_set_header X-Forwarded-Proto $scheme;
                proxy_set_header X-Real-IP $remote_addr;
                proxy_set_header X-Forwarded-For $proxy_add_x_forwarded_for;
                add_header Front-End-Https on;

                proxy_pass http://sessions-auth-app/;

               location /sessions-auth-app/api/ {
                         proxy_headers_hash_max_size 512;
                         proxy_headers_hash_bucket_size 64;
                         proxy_set_header Host $host;
                         proxy_set_header X-Forwarded-Proto $scheme;
                         proxy_set_header X-Real-IP $remote_addr;
                         proxy_set_header X-Forwarded-For $proxy_add_x_forwarded_for;

                        proxy_pass http://authserver;
                }

        }
}
This completes the walkthrough for the the site.conf file.
Putting It All Together
This is the part where we test our setup, before we begin, you must make sure you have the following prerequisites.
-
A valid domain name and DNS Provider.You can buy a domain name from vendors like GoDaddy,NameCheap,Gandi etc, these vendors also serve as your DNS provider.
-
A Virtual Private Server running Ubuntu 18.04, You can get a 512MB RAM VPS Free for 12 Months from vendors like AWS, Microsoft Azure or Google Compute Cloud
-
A Static IP assigned to your VPS, again this is free for 12 months on most vendors, and Open Ports 80( HTTP ) and 443( HTTPS )
-
Point your Domain name to your VPS’s static IP, so that it is accessible to the wider Internet, through your domain name.
Once these are taken care of, you SSH into your VPS, and install Docker and Docker Compose by
sudo apt install apt-transport-https ca-certificates curl software-properties-common
curl -fsSL https://download.docker.com/linux/ubuntu/gpg | sudo apt-key add -
sudo add-apt-repository "deb [arch=amd64] https://download.docker.com/linux/ubuntu bionic stable"
sudo apt update
sudo apt install docker-ce docker-compose
The first line of these commands installs the prerequisites for Docker, the second and third add the Official Docker repository to your system so that you always get the latest docker related packages, then we do an update, and finally we install Docker and docker-compose
Next we download my NGINX Reverse Proxy Gateway, for convinience,this is the finished product of what we were discussing till now in this blog post, containing the docker-compose.yml and the site.conf needed to get our NGINX Reverse Proxy Gateway container up and running.
git clone https://github.com/shawn-dsilva/nginx-reverse-proxy-gateway.git
Before proceeding any further remove all references to `demos.shawndsilva.com` from the docker-compose.yml and site.conf etc files in this repo, and replace them with your own domain name, the index.html file contains a redirect to https://shawndsilva.com/#projects, be sure to change this
Now we change into it’s directory and run it using docker-compose
cd ~/nginx-reverse-proxy-gateway
docker-compose up -d
The command docker-compose up builds and runs the container while the -d option simply puts it into the background after it has finished starting up.
This container can be shut down by docker-compose down --remove-orphans.If you have problems with the docker-compose commands, try prefacing them with sudo
Now that our Gateway is up and running, we need a Web App to test it’s reverse proxying functions, we will be using my MERN Login Signup Component for this.This is an app consisting of a ReactJS front-end served from a Docker container running NGINX and a NodeJS REST API Backend Server in a Docker Container, MongoDB is the database, and this project uses MongoDB Atlas instead of a local instance of MongoDB. This is a simple Login and Signup Web App, supporting sessions, start by cloning the repository to your VPS
git clone https://github.com/shawn-dsilva/mern-login-signup-component.git
Create a .env file using .env template as a reference, and fill it up with your MongoDB Atlas username, password and cluster.
This app can be run without MongoDB Atlas and with a local MongoDB Instance instead, but that will require a minor rework and won't be covered in this article
In server.js uncomment( remove the preceding //) the lines starting with app.use()
//app.use("/sessions-auth-app/api/users", require("./routes/users"));
//app.use("/api/auth", require("./routes/auth"));
and comment out or remove this line
app.use("/api/users", require("./routes/users"));
In client/package.json change demos.shawndsilva.com in "homepage": "https://demos.shawndsilva.com/sessions-auth-app" to whatever your domain name is, you can keep the sessions-auth-app part though.
In client/src/actions/authActions.js change demos.shawndsilva.com in the line axios.defaults.baseURL = "https://demos.shawndsilva.com/sessions-auth-app" to whatever your domain name is, and comment out axios.defaults.baseURL = "http://localhost:5000";
Lastly we run this app
cd ~/mern-login-signup-component
sudo docker-compose -f docker-compose-prod.yml up -d
The -f flag tells docker compose to use a specific docker-compose.yml that is specified right after it.
"demos.yourwebsite.com" should be the domain name you have decided to use for your setup, not literally "demos.yourwebsite.com".
You should now be able to access your Web App’s front end at demos.yourwebsite.com/sessions-auth-app and the backend at demos.yourwebsite.com/sessions-auth-app/api.