
MERN Sessions-Based Login and Registration App Part Two React & Redux Frontend
Thursday, December 10, 2020 Posted in Web-DevelopmentTags : React Redux Frontend
This is the second part in a series about building a full stack MERN( MongoDB, Express, React, NodeJS ) based Authentication Web App using Sessions & Cookies.
In this part you will be introduced to React and Redux
About the ReactJS Framework and Single Page App(SPA) websites
ReactJS is a JavaScript framework for the front-end on the client-side(i.e the user’s web browser), unlike NodeJS which works on the backend, on the server-side.
Before getting into the features and quirks specific to React,we need to understand the requirement for ReactJS and it’s rivals like Angular and Vue.js, that is the the paradigm of the “Single Page App” website.
The Single Page App model is a new paradigm in web development, which makes websites seem like “Apps” that you have installed on your smartphone or PC rather than traditional page-based websites model, this is accomplished through sending a single JavaScript “bundle” file along with an index.html file to the user’s browser, where the JS bundle file contains all the logic needed make the website seem like a page based website, but in reality all the “frontend” work is done by the code in this JS file on the browser, rather than querying a server for an HTML file from the server every time the user clicks a link, your JS code on the browser manipulates the index.html file to display whatever is necessary instead, the SPA model is also efficient in that it only queries the server for data in the JSON format, where the server is an API server rather than a traditional web server that returns web pages, functions traditionally done by the web server, like routing, protected routes etc are handled by the JS code of the SPA instead.
Functions like templating, where the web server fills in a pre-existing HTML template with the required variables and sends the file as a response back to the browser, are again taken over by the SPA’s JS code, but it isn’t a 1:1 comparison, since every framework does this differently, altough none follow the templating paradigm where a fresh HTML file is returned.
On React this function is handled by Components and their JSX syntax, JSX is a JavaScript subset that allows you to use HTML code within JavaScript, allowing you to write more intuitive and understandable code
How Things are Done the React Way
React uses Components for most of these features, these can either be a function or a class that returns JSX, that is, HTML code within our JavaScript file.
To start out, we first create a React project using create-react-app like so
npx create-react-app my-app
Here my-app is just the name of the folder you want your React project to be in.
Post-Installation, you may see a file structure like this.
my-app/
  README.md
  node_modules/
  package.json
  public/
    index.html
    favicon.ico
  src/
    App.css
    App.js
    App.test.js
    index.css
    index.js
    logo.svg
There are three core files here, index.html, App.js and index.js.
App.js is a Component that will contain all your created components
import React from 'react';
import logo from './logo.svg';
import './App.css';

function App() {
  return (
    <div className="App">
    // Your components will go here
    </div>
  );
}

export default App;
Then the App component is imported into index.js
import React from 'react';
import ReactDOM from 'react-dom';
import './index.css';
import App from './App';
import * as serviceWorker from './serviceWorker';

ReactDOM.render(
  <React.StrictMode>
    <App />
  </React.StrictMode>,
  document.getElementById('root')
);

// If you want your app to work offline and load faster, you can change
// unregister() to register() below. Note this comes with some pitfalls.
// Learn more about service workers: https://bit.ly/CRA-PWA
serviceWorker.unregister();
And then ReactDOM.render() is used to place you component into a div with the id root in the index.html file.
As an aside, React Components can also be written as Classes instead of Functions, and i prefer using Classes, even though React promotes Functional Components today.
The App component can be rewritten as a Class below
import React , { Component } from 'react';
import logo from './logo.svg';
import './App.css';

class App extends Component {
  render() {
    return (
        <div className="App">
        // Your components will go here
        </div>
      );
  }

}

export default App;
State Management using React, and why do we need Redux?
There are two ways to pass in data to Components in React, this is through Props, which are provided from outside the component, and State, which is inside the component but inaccessible from outside it.
We will first look at Props in Components.
Props
First we create a folder called components and create a file called HelloWorld.js inside it.
mkdir components
touch components/HelloWorld.js
Add the following code to HelloWorld.js
import React , { Component } from 'react';

class HelloWorld extends Component {

  render() {
    return (
        <div>
          <h1>Hello {this.props.text}</h1>
          </div>
      );
  }

}

export default HelloWorld;
Now in our App component, we import the HelloWorld component and pass in the prop text like so
import React , { Component } from 'react';
import logo from './logo.svg';
import './App.css';
import HelloWorld from './components/HelloWorld';

class App extends Component {
  render() {
    return (
        <div className="App">
        <HelloWorld text={"World"}/>
        </div>
      );
  }

}

export default App;
This example, even though a trivial one, illustrates this core React Components Concept.
A Functional Component that gets its data in the form of props is a useful technique for “Seperation of Concerns”, i.e in this case keeping the Logic and Presentation of your App seperate, for example a Functional Component can receive an array of data from it’s Parent Component as props, and then render that array as an HTML list with CSS Styling, while the array of data itself may be obtained in the Parent component by fetching it from the Backend Server’s API.
State
We now move on to State.
State in the React context is simply an object that contains data, this data can be objects, array, strings, bools, integers etc.
Upon each state change, the Component’s render() method is called, re-rendering the current component, and updating the DOM with the current state value, if the render() method contains references to the state item.
State is immutable, and can only be changed or updated using a special setState() method, which takes an object containing the state element’s key as the key, and a given value as it’s value.
State updates are asynchronous meaning all the state updates do not happen in the order in which they are written, which can lead to unexpected behavior, if you have some other logic that depends upon the updated values of the state, for example a JWT token being loaded into the state upon login, after which a redirect is done to the dashboard or profile page, it can so happen that the dashboard or profile component sees the JWT token in the state as undefined, because it was updated asynchronously, and not in the order you intended, A remedy to this problem will be provided at the end of this short example on React State.
We will be using the same files from the previous props example, only this time the HelloWorld component will be provided the this.state.name element as a prop, and not a hardcoded value, Instead of “Hello World”, what will be printed out to the screen will be “Hello User”, here User is a name provided by the user through and input box, this name will be stored in the State using the setState() method, and then provided to the HelloWorld component as a prop
import React , { Component } from 'react';
import logo from './logo.svg';
import './App.css';
import HelloWorld from './components/HelloWorld';

class App extends Component {

state = {
    yourName : "",
    show:false
  }

  handleChange = (e) => {
    this.setState({ [e.target.name]: e.target.value });
  }

  handleSubmit = (e) => {
    e.preventDefault();
    this.setState({show:true});
  }

  render() {
    return (
        <div className="App">
      <form onSubmit={this.handleSubmit}>
          <br></br>
          Enter your Name
          <br></br>
          <br></br>

          <input type="text" name="yourName" onChange={this.handleChange} />
        <input type="submit" value="Submit" />
      </form>
      {
        this.state.show && <HelloWorld text={this.state.yourName} />
      }
    </div>
      );
  }
}

export default App;
In this modification to the App component, we now have an input form, with only one field, that is your name, we also have two React functions in ES6 syntax, one for adding your name to the state as you type, that is handleChange() and the other is handleSubmit(), which turns our control variable show in the state to true using the setState() function, this displays our HelloWorld component with the completed name in this.state.name.
Although most of this code is intuitive enough, I’ll clear some sections of code that your might find confusing.
  handleChange = (e) => {
    this.setState({ [e.target.name]: e.target.value });
  }
In the handleChange function e.target.name here is the value of the name attribute in the input field
which is yourName, and so is yourName a field in the state
e.target.value is whatever text you have entered into the input box
e.g if the input entered is “Shawn”, the setState object will be {yourName: "Shawn"} and the output from the HelloWorld component will be “Hello Shawn”.
Now to the next one.
{
    this.state.show && <HelloWorld text={this.state.yourName} />
}
The above is a condition, that is once this.state.show is true, it will render the component HelloWorld with the yourName field of the state passed in as a prop, It is the short hand syntax for writing an “if” code block like
if(this.state.show) {
  <HelloWorld text={this.state.yourName} />
}
However if you wanted to add an “else” clause, say with a different component taking in a different state item as a prop, you would have to use ternary operator syntax like this
{
   this.state.show ? <HelloWorld text={this.state.yourName} /> : <OtherComponent  props={this.state.item}/>
}
To know more about State, you can also check out the Official React docs.
The need for Redux.
In React, each component has it’s own state, and you can only transfer state data from one component to another by passing the Parent component’s state data to it’s Child component as props, this quickly becomes messy code and can result in a phenomenon called “Prop Drilling” i.e you are forced to pass state data to intermediate components as props, in order for them to be finally passed to your intended component as props, while you may not make use of the state data in these intermediate components at all.
Furthermore, you cannot pass props of the Child component back to the Parent, you have to rely on functions of the Parent component passed on to the Child component as props, and these functions can cause state changes in the state of the Parent, so any changes using these functions in the child component cause a re-render because the Parent component’s state data has been changed.
Redux is the solution to this issue, Redux provides a Global state store that any component can tap into using the connect() method, which makes prop drilling obsolete, However
Redux also is very boiler plate heavy, but that is a small price to pay for the cleaner, well organized code it provides, along with the Global state store.
Working with React & Redux
Redux is primarily made up of these three main parts.
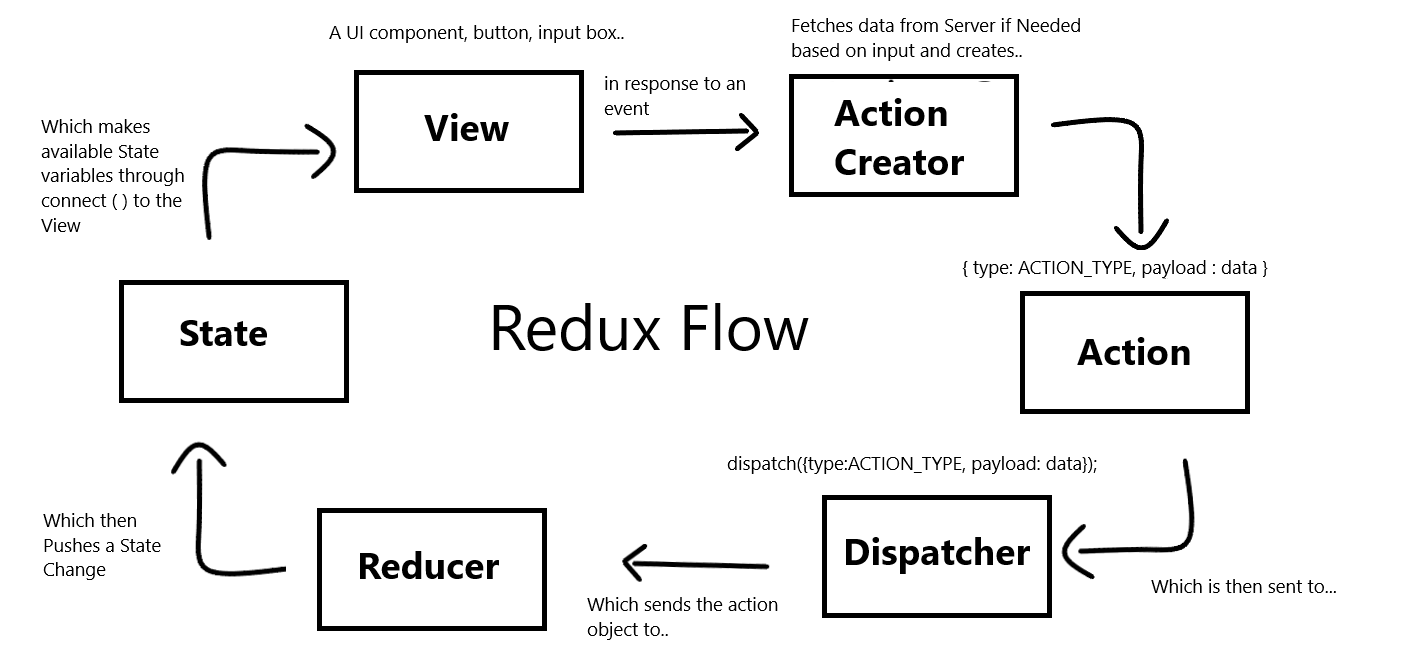
The Store contains the entire state-tree of your application and this state is immutable, cannot be changed directly and changes to the state can only be made by dispatching an Action to the Reducer which will update the state tree Store, the global state provided by the store can be accessed in React components using the connect() method.
An Action is an object containing a type which is a constant described in a types.js file, and a payload, which is data that will be used in the state update.
Data for the Payload is obtained using a GET or POST request to an endpoint by using either the axios package or Fetch in an Action Creator function, the Action is then sent over to the Reducer using the dispatch() method.
The Reducer contains declarations of items in the state, these can be strings, numbers, objects, arrays etc, and a large switch statement which checks the type of an incoming action and according to the code written in the switch statement updates the state with this action’s payload accordingly.
This completes this blog post, a Practical example of the “theory” in this post will appear in the next and final post of this series, which will contain a walkthrough of an actual React Redux app