
MERN Sessions-Based Login and Registration App Final Part : React & Redux Frontend
Tuesday, June 8, 2021 Posted in Web-DevelopmentTags : React Redux Frontend
This is the final part in a series about building a full stack MERN based Authentication Web App, this part focuses on React and Redux Front-End.
In this part we will complete our app by creating it’s frontend using ReactJS and Redux
React & Redux Tutorial/Code walkthrough
The following is a walkthrough of how a simple, but real React-Redux application looks like and works, in particular, I’ll be using my MERN Login Signup Component for this tutorial, you can use this “package” as a starting point for your own project, it implements a basic session based authentication( Login/Registration ) system with React/Redux for the front end, and a NodeJS API Backend with a MongoDB database.
For our purposes of explaining React-Redux, we will be looking at the contents of the client folder, specifically the src directory which contains our components, actions and reducers, along with the store initialized in the store.js file
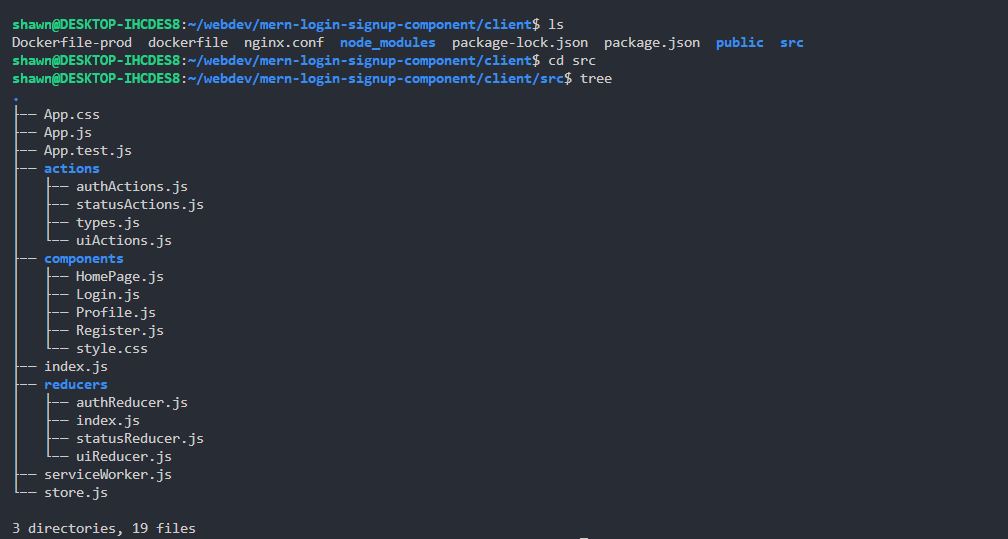 We will first look at how our
 store is initialized in the store.js file
import { createStore, applyMiddleware, compose } from 'redux'
import thunk from 'redux-thunk';
import rootReducer from './reducers';

const initialState = {};
const middleware = [thunk];
const composeEnhancers = window.__REDUX_DEVTOOLS_EXTENSION_COMPOSE__ || compose;

const store = createStore(rootReducer, initialState, composeEnhancers(
    applyMiddleware(...middleware),
    // window.__REDUX_DEVTOOLS_EXTENSION__ && window.__REDUX_DEVTOOLS_EXTENSION__()
    ));

export default store;
The store is simply an object, hence the initialState variable is set to an empty object, for this project I am using a Redux Middleware called Thunk, the last variable, composeEnhancers is to add the “hooks” in for a Google Chrome extension utility called “Redux DevTools”, this allows you to inspect actions dispatched to the state, state changes, diffs between changes etc in real time.
Then the “store” is created by the createStore function, which also takes in a rootReducer, this is just a combination of all the reducers you have defined seperately.
The store is then exported, and is used in the App.js file
import React , { Component } from 'react';
import HomePage from './components/HomePage';
import Profile from './components/Profile';
import { Route, Switch} from 'react-router-dom'
import 'bootstrap/dist/css/bootstrap.min.css';
import './App.css';
import { Provider } from 'react-redux';
import store from './store';


class App extends Component {

  render () {
    return (
      <Provider store={store}>
            <Switch>
              <Route exact path ="/profile" component={Profile}/>
            </Switch>
        < HomePage/>
      </Provider>
    );
}
}

export default App;
The App.js component is the entry point of your React application, so it is here that the initialized store is added to your application via the <Provider/> component that the rest of your application is wrapped in, the core of my app is contained in the <Homepage/> component, while the below section of code
<Switch>
      <Route exact path ="/profile" component={Profile}/>
</Switch>
Makes use of a package called React Router, in order to provide “page based” like routing functionality, on visiting a route like /profile, the appropriate component is loaded, however the focus of this tutorial is not routing, we now go to the next part of this tutorial that are the components themselves.
Homepage Component
We are going to look at HomePage.js first which is out main component, from where Login and Register components are conditionally loaded, or uses is redirected to the Profile page( also a component ) if he has already logged in.
First up are our Imports
import React, { Component } from 'react';
import Login from './Login';
import Register from './Register';
import { connect } from "react-redux";
import { Route, Switch, Link } from 'react-router-dom'
import {
  Button,
} from "reactstrap";
import PropTypes from "prop-types";
import { buttonClicked } from "../actions/uiActions";
import './style.css';
import store from '../store';
import { isAuth } from '../actions/authActions'
import {Redirect} from 'react-router-dom'
We first import React itself, then our Login and Signup components, the connect component which allows us to access the Redux global state in our component, various react-router-dom components to simplify our routing, Reactstrap/Bootstrap UI elements, PropTypes which is necessary for Redux to work, and actions like isAuth and buttonClicked which are our redux actions, and finally the Redux store.
Moving on to our HomePage class/component
Using the componentDidMount() function, we first check using isAuth() is a session cookie is present, this will fire the isAuth() action, which will update the isAuth object in the redux global state if a cookie exists and it is of a legitimate user.
We then declare the propTypes object, this simply assigns the expected type of our state variables from the global Redux state, accessed using the connect function, the common types are bool, string, array, func and object.
export class HomePage extends Component {

  componentDidMount() {
    store.dispatch(isAuth());
  }
  static propTypes = {
    button: PropTypes.bool,
    isAuthenticated: PropTypes.bool,
  };

  render() {

    if(this.props.isAuthenticated) {
      return <Redirect to="/profile" />
    }

    return (
       <div className="container">
        <div className="main">
          <h1 style={divStyle}> <strong>MERN</strong> Sessions Auth App </h1>
          <br/>
            <h5 style={divStyle}>Minimalistic Sessions based Authentication app <span role="img" aria-label="lock">🔒 </span><br></br>Built with React + Redux, NodeJS, Express, MongoDB and Bootstrap</h5>
            <h5 style={divStyle}>Uses Cookies <span role="img" aria-label="lock">🍪 </span></h5>
          <br/>
          <div>
            <Switch>
              <Route exact path ="/login" component={Login}/>
              <Route exact path ="/register" component={Register}/>
            </Switch>
             { this.props.button && <Link className='divStyle' to="/login">
               <Button size="lg"  color="light">Sign In</Button>
               </Link>}
             {this.props.button && <Link className='divStyle' to="/register">
               <Button  size="lg"  color="light">Register</Button>
             </Link>}
          </div>
        </div>
    </div>
    )
  }
}
The render() function is the meat and potatoes of this file, it is here that the component is fleshed out with it’s functionality, first we check if a user is already logged in by checking this.props.isAuthenticated which comes from the Redux global state, using the mapStateToProps() function, which is at the end of this file.
In the render function’s return we can see the nested div elements, these also have CSS classes, and this is what our homepage will look like

We will now look at the two functional parts of this code
  <Switch>
    <Route exact path ="/login" component={Login}/>
    <Route exact path ="/register" component={Register}/>
  </Switch>
The Switch and Route components here come from the react-router package, these simply tell our app to load the given component when user click’s it’s link, for example /login will load the Login component, /register will load the Register one, etc.
These components will be loaded within the same HomePage component.
 { this.props.button && <Link className='divStyle' to="/login">
               <Button size="lg"  color="light">Sign In</Button>
               </Link>}
             {this.props.button && <Link className='divStyle' to="/register">
               <Button  size="lg"  color="light">Register</Button>
             </Link>}
The above bit of functional code just removes the “Login” and “Signup” buttons when either is clicked, and the associated component loaded, the buttons are only shown if this.props.button is true, which is it’s initial state, when a button is clicked, this state is changed to false, hiding the buttons, this finishes up our return from the render function.
Lastly we look at the MapStateToProps function and the connect function
const mapStateToProps = (state) => ({ //Maps state to redux store as props
  button: state.ui.button,
  isAuthenticated: state.auth.isAuthenticated

});

export default connect(mapStateToProps)(HomePage);
mapStateToProps does what it says, it maps the state variables in the global Redux state located on the right, for example state.auth.isAunthenticated, into the props of the current component using a variable name you specify, in this case isAuthenticated, the state variables are updated each time a render function is called globally, using Redux.
The last tine “connects” this component to the Redux global state, with our mapStateToProps telling it which state elements we want to use in our component. With this, we are finished with our Homepage Component explanation
Login Component, Actions and Reducers
Both the Login and Register components are very similar, so a tutorial about the Login Component will also help you understand how the Register component works. You can see the entire Login Component file here
Instead of first going over the component itself, we will go over the login Action and the AuthReducer first to get a deeper understanding of the Redux flow.
In a Redux Action we usually make an HTTP request( GET, POST etc ) to our server for some data, using an HTTP client package like axios or JavaScript’s fetch API, after the data is received, we send it over to the Redux reducer to be added( other operations can also be taken in the Reducer) into the global Redux state using the dispatch() method from Redux’s connect(), This is the gist of Redux actions, now we will dive into the code
import axios from "axios";
import { returnStatus } from "./statusActions";

import {
  LOGIN_SUCCESS,
  LOGIN_FAIL,
  REGISTER_SUCCESS,
  REGISTER_FAIL,
  AUTH_SUCCESS,
  AUTH_FAIL,
  LOGOUT_SUCCESS,
  IS_LOADING,
} from "./types";
We first import the axios package that will be used to make HTTP requests to our server, we also import another action, returnStatus will is used to flash an error message in our Login component if the Login attempt fails for whatever reason.
The next set of imports are types from the file of the same name, these are string constants that are used as an identifier in your dispatch function, since the Reducer is a giant switch statement, according to each type a different set of actions can be coded to take place during the Redux global state in the Reducer.
//Login User
export const login = ({ email, password }) => (dispatch) => {
  // Headers
  const headers = {
    headers: {
      "Content-Type": "application/json"
    }
  };

  // Request body
  const body = JSON.stringify({ email, password });

  axios
    .post("/api/users/login", body, headers)
    .then((res) => {
      console.log(res);
      dispatch({
        type: LOGIN_SUCCESS,
        payload: res.data
      });
      dispatch({ type: IS_LOADING });
    }
    )
    .catch((err) => {
      dispatch(returnStatus(err.response.data, err.response.status, 'LOGIN_FAIL'))
      dispatch({
        type: LOGIN_FAIL
      });
      dispatch({ type: IS_LOADING })
    });
};
We have our login function above, this takes an email and password as parameters, the dispatch function is provided by Redux’s connect() function, the first few lines are setting up the headers and creating the body for the request, then we make a POST request to the /api/users/login route using Axios, this is a Promise, so it resolves with a response or an error, if a proper response is returned, the data is dispatched with the type of LOGIN_SUCCESS using ` dispatch({type: LOGIN_SUCCESS, payload: res.data });, a second dispatch is made, that has the type IS_LOADING, this starts the "spinner" animation in the Login button,
Else if an error is returned, dispatch is used to call the returnStatus()` method, keep in mind using dispatch is the only way another Redux Action can be called from within the current action, we then dispatch LOGIN_FAIL and IS_LOADING, with this our Redux actions section is complete, let’s look at Redux Reducers next.
We’re going to look at authReducer.js, this contains the Reducer used for our Login, Registration etc actions, there can be other reducers also, like we have the uiReducer.js and statusReducer.js, these all are combined into one reducer by the index.js in the reducer folder using combineReducers().
import { combineReducers} from 'redux';
// import errorReducer from './errorReducer';
import authReducer from './authReducer';
import uiReducer from './uiReducer';
import statusReducer from './statusReducer';


export default combineReducers({
    // error: errorReducer,
    auth: authReducer,
    ui: uiReducer,
    status: statusReducer
});
Our AuthReducer like all reducers starts out with imports of the types
import {

  AUTH_ERROR,
  LOGIN_SUCCESS,
  LOGIN_FAIL,
  LOGOUT_SUCCESS,
  REGISTER_SUCCESS,
  REGISTER_FAIL,
  AUTH_SUCCESS,
  AUTH_FAIL
} from "../actions/types";
Then we set the initialState which is an object containing all the other state variables, these can be bool, objects, strings, arrays etc.
const initialState = {
  isAuthenticated: null,
  user: null,
};

export default function (state = initialState, action) {

  switch (action.type) {
    case REGISTER_SUCCESS:
      return {
        ...state,
        user: action.payload
      };

    case LOGIN_SUCCESS:
    case AUTH_SUCCESS:
      return {
        ...state,
        isAuthenticated: true,
        user: action.payload
      };

    case AUTH_ERROR:
    case LOGIN_FAIL:
    case LOGOUT_SUCCESS:
    case REGISTER_FAIL:
    case AUTH_FAIL:
      return {
        ...state,
        user: null,
        isAuthenticated: false,
      }

    default:
        return state;
  }

}
We then move onto the actual Reducer logic that is a switch statement which takes in the type of the action as a value, and then returns the rest of the state ( using the spread operator ...state ) and sets the state variable with the “payload” of the action, we can also make multiple cases return and set the same state variables, for example, both the LOGIN_SUCCESS and AUTH_SUCCESS will return the same state object, with isAuthenticated set to true, and user set to the action payload, that is the user data
    case LOGIN_SUCCESS:
    case AUTH_SUCCESS:
      return {
        ...state,
        isAuthenticated: true,
        user: action.payload
      };
One thing to note about state variables is that they are immutable, and cannot be changed directly, any changes to the state variable have to be done using a copy of the current state, which is then assigned to the state variable, this project is a simple one, and we will not be going into complex update/deletion of state variables.
We now see everything come together in the form of our Login component. As mentioned before, you can see the entire Login Component file here, below we will only be going through the functions and the render function, imports, propTypes have been omitted for brevity
We are going to go step by step, the first function is componentDidMount() here we are calling the buttonClicked action when the Login component is loaded, this removes the Login and Signup buttons from the homepage screen, and leaves only the Login component.
Next is componentDidUpdate() this depends on the prop status, status is a Redux state variable mapped to props, this status object contains error or sucess messages relating to the Login functionality, if the id is LOGIN_FAIL, the msg variable in the local state is set to status.statusMsg and is diplayed in the Login component
 componentDidMount() {
    this.props.buttonClicked();
}

componentDidUpdate(prevProps) {
      const status = this.props.status;

     if (status !== prevProps.status) {

      if (status.id === "LOGIN_FAIL") {
        this.setState({ msg: status.statusMsg });
      }
    }
};


onChange = (e) => {
    this.setState({ [e.target.name]: e.target.value });
  };

onSubmit = (e) => {
    e.preventDefault();

    const { email, password} = this.state;

    const user = { email, password};
    this.props.isLoading();
    this.props.login(user);
  };
The code in onChange function sets the email and password to the associated local state values as the user types in this data in the email and password fields.
On submit creates a user object with the email and password, the isLoading() action is called which sets the loading prop to true which inturn starts the “is loading” spinner animation in the submit box, while the login action is called with the user object, this makes a request to the backend server with the user data, for either successful login or an error, a response is sent, if an error has occured, the error message is displayed in the Login component.
Now we will check the render function, this contains the html/css/jsx that the user sees as the Login form in his browser window, right at the top of the login component, inside the <CardBody> is the space for displaying error messages, this is based on the condition of the local state variable msg not being empty, if it isn’t empty, it means there is a message, and this message is displayed.
  render() {

    let className = 'divStyle';
    if (!this.props.button) {
      className = 'formStyle';
    }
    return (
      <div className={className}>

            <Card>
                <CardBody >
                  <CardTitle> <h2><strong>Login</strong></h2></CardTitle>
                <CardSubtitle className="text-muted">Don't have an account?
                <Link to="/register"> Register. </Link></CardSubtitle>
                <br/>
                {this.state.msg ? (
              <Alert color="danger">{this.state.msg}</Alert>
            ) : null}
                  <Form onSubmit={this.onSubmit} >
                  <FormGroup>

                    <Label for="email">E-mail</Label>
                    <Input
                      type="email"
                      name="email"
                      id="email"
                      size="lg"
                      placeholder="you@youremail.com"
                      className="mb-3"
                      onChange={this.onChange}
                    />

                    <Label for="password">Password</Label>
                    <Input
                      type="password"
                      name="password"
                      id="password"
                      size="lg"
                      placeholder="Enter your Password"
                      className="mb-3"
                      onChange={this.onChange}
                    />
                    <Button size="lg" color="dark" block>
                       { this.props.loading ?
                       <span >Logging in.. <Spinner size="sm" color="light" /></span> : <span>Login</span>}
                    </Button>
                  </FormGroup>
                </Form>
                </CardBody>
            </Card>

      </div>
    )
  }
In our Form component are the email and password fields, onSubmit is set to our onSubmit() function, while onChange is again set to our onChange() function for the email and password fields, the Login submit button contains a conditional statement depending on the this.props.loading which is a Redux state variable, when this variable is set to true, the “Logging In” snippet with a spinner animation is swapped in, till the Login request is completed, after which this.props.loading is set to false
At last we come to MapStateToProps and MapDispatchToProps.
const mapStateToProps = (state) => ({ //Maps state element in redux store to props
  //location of element in the state is on the right and key is on the left
  button: state.ui.button, //store.getState().ui.button another way to get button bool
  isAuthenticated: state.auth.isAuthenticated,
  status: state.status,
  loading: state.ui.loading
});

export default connect(mapStateToProps,{ login, isLoading, buttonClicked })(Login);
MapDispatchToProps are the { login, isLoading, buttonClicked } object containing our actions that use the dispatch function, these also have to be “mapped to props” in order to use them in our component, while wrapping them in connect() provides our actions the dispatch function.
With this, our Login Component tutorial is complete, The Register component also looks similar, so this completes our tutorial of the React/Redux front end of our simple Login/Signup component app